


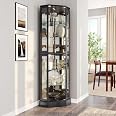
BELLEZE Lighted 3-Side Glass Display Curio Cabinet with Tempered Glass Doors and Shelves, Curved Wood Corner Cabinet with Bulb, Corner Curio Storage Rack for Bar and Liquor Storage - Ashfield (Black)
Details
- BrandBELLEZE
- ColorBlack
- Recommended Uses For Product[Decorative
- Product Dimensions26"D x 19.5"W
- Special FeatureLighted Glass

Description
✨ Elevate Your Display Game!
- EASY ASSEMBLY - Get set up in no time with straightforward instructions.
- ELEGANT DESIGN - Transform your space with a classic silhouette that complements any decor.
- AMPLE DISPLAY SPACE - Showcase your treasures with 6 adjustable shelves and stunning glass doors.
- DURABLE CONSTRUCTION - Crafted from high-quality materials for lasting beauty and strength.
- SPACE SAVING SOLUTION - Perfectly fits into corners, maximizing your room's potential.
The BELLEZE Lighted 3-Side Glass Display Curio Cabinet is a stylish and functional storage solution, featuring tempered glass doors, adjustable shelves, and a sleek design that fits perfectly in any corner of your home. With a weight capacity of 150 pounds and easy assembly, it's the ideal choice for showcasing your favorite collectibles.


Specifications
| Item Weight | 82.6 Pounds |
| Item Dimensions D x W x H | 26"D x 19.5"W x 72"H |
| Door Style | Flat Panel |
| Item Shape | Triangular |
| Finish Types | wood grain |
| Style Name | Classic |
| Color | Black |
| Handle Material | Wood |
| Frame Material Type | Medium-Density Fiberboard (MDF) |
| Back Material Type | Wood |
| Top Material Type | Engineered Wood |
| Material Type | Wood |
| Required Assembly | Yes |
| Mount Type | Freestanding |
| Base Type | Pedestal |
| Number of Compartments | 6 |
| Is Customizable? | No |
| Is Electric | No |
| Number of Doors | 2 |
| Number Of Shelves | 6 |
| Number of Pieces | 3 |
| Additional Features | Lighted, Tempered Glass Doors |
| Mounting Type | Floor Mount |
| Weight Capacity Maximum | 150 Pounds |
Reviews
M**9
Works great, looks great
Works great, looks great. I was able to assemble by myself but directions recommend two people. I used more glue than provided since directions only direct glue for the wooden dowels and I used a drill to attach the many small screws into the back panels since the pre-drilled holes were only on the thin panel and were not on the boards you need to screw the back panel onto. I'm happy with the capacity and the directions were pretty easy to follow.
G**I
Perfect
Perfect
R**H
Looks good but a drill is necessary to build
The cabinet looks quite nice when put together. I purchased the cherry cabinet and the wood is nice. The glass is tempered and quite strong. I only found one very small nick in the wood pieces.The wood pieces are held together with dowel pegs and large bolts screwed into metal sleeves. There was no problem putting the basic frame together.The difficulty was in putting on the back sides (as the cabinet sits in a corner, there are 2 back sides). The "mirror" is not a glass mirror but is thick and bendable. I did not find the mirror easily scratched as another review I read said. However, there is just a narrow lip in the wood frame that the mirror lays in. The lip is barely as deep as the thickness of the mirror and the lip edge that holds the mirror is only about 1/8". So it is difficult to hold the mirror in place under the backing as the instructions give while attaching the actual backing.The side backing is bendable but is thicker--about 1/8"--than a lot of bookcase and desk backings that I have put together in the past. There are pre-drilled holes (16 on each side back) in the backing through which to screw the back onto all 4 sides of the wood frame (one which has tempered glass inside the front side frame section).HOWEVER, there are no starter holes in the wood frame in which to place the screws holding the backing. So you really do need a drill to make the starter holes. (I've done IKEA bookcases and other items that say you need a drill but the starter holes were already there and a drill was not needed.) Additionally with the 5-sided shape of the cabinet (which I love except for the build), you cannot have the side back securely parallel to the floor or table while installing the side backing. So you have to hold the backing in place (about 3' long) at about a 45 degree angle while making the holes in the frame around the outside edge of the 3' x roughly 1' backing sheet.I also found I could not have the mirror in place under the backing while doing this. So I had to get my holes drilled without the mirror (the screw holes do not go through the mirror). Then after I made all the holes, I loosely screwed on the backing in a few places and slid the mirror under the backing before putting in all the screws (16) in the backing. By my third side (the bottom and top section each have 2 sides so there are 4 side backings for each cabinet) I found that it was best to do the middle screws on the long sides of the back before sliding the mirror underneath. I could then make certain the mirror was securely in the lip edging that is to hold it at the top and bottom as well as along the long side. (The mirror slid off the edging easily.) After I had the mirror in place, I could finish screwing on the back. The instructions say it should take 80 minutes to build, but it took me a LOT more time.I did not use the light that came with the cabinet but got some small round LED puck lights. I will enjoy displaying my curios in the cabinet.
K**S
Lighted curio cabinet
This cabinet is very well made and beautiful for the price. The only thing I have to agree with is the light which is extremely distracting as it reflects and shine directly in your eyes.Customer service is beyond helpful and they have great communication. I love this cabinet and the seller is beyond great!
S**Y
VERY PLEASED
Delivered in a timely manner. All pieces were with the unit. Extra hardware available in case of accidental loss. No defects or scratches. I was very satisfied overall. Thank You
T**.
Assembly tips for others. So far I think this is a very good item.
The drawings are reasonably well done, but there are a few things I can advise. It says two people to assemble. For me this was necessary at 1 point only- placing the top half on top of the bottom half. Other than that I was able to do all steps myself. Also- as others have mentioned in reviews- take it slow. Don't rush!!!!During step 3 and step 6, use the stryrofoam blocks (the thick square and the 2 triangles) to hold panel 6 as you place it (see pic). Then during step 9 when you are going to put back panels 8 on use the triangles again and something heavy against them. (pics) Be precise when placing the #8 back panels as pictured. Once placed, drill pilot holes with a 1/16" bit for all the screws "L" to prevent any splitting of wood. I drilled one at each corner then screwed those in so the panel wouldn't be able to move, then completed all the others. I don't recommend using an drill / electric screwdriver to install the screws.... to easy to strip them out and they are short screws.And finally- when putting on the doors, you can hold the top bracket on with a piece of painters tape. After I did the top glass door, I found that placement of the brackets was about 5/16" from the edge. The second door I attached the bottom bracket first measuring 5/16" in, then slid it in to the top but it may actually be easier to attach the top and then slide into the bottom (???).Removal of the numbering stickers- I used 70% isopropyl alchohol. 90% is too strong and may affect the finish.Hope these tips are helpful to others....
A**R
As described
Very beautiful
C**C
There is only one light bulb and it shines in your eyes. .
It many ways it is just what I wanted!But the lighting is not at all what they advertise. The light bulb shines straight out instead of down on to what is on the shelves. I will be looking for some other lighting options and hopefully will find something to light it like in the photos. I’m disappointed that the bottom shelving is so dark.My son put it together for me and went together well everything fitting.
Common Questions
Trustpilot
1 month ago
3 days ago
